Ventilation for Airtight & Passive House Homes
Passive house ventilation in 2026: ERV vs HRV selection, sizing to ASHRAE 62.2, duct design, commissioning, and real installed costs.
10 MIN READ · UPDATED 2026-09-22
Key takeaways
- Airtight homes need continuous balanced mechanical ventilation with heat recovery — accidental leakage no longer refreshes the air, by design.
- Choose ERV for hot-humid and mixed-humid climates, HRV for cold dry climates; installation quality dominates real-world performance more than rated efficiency.
- Size continuous ventilation to ASHRAE 62.2 (roughly 7.5 CFM per occupant plus 3 CFM per 100 sq ft) and select equipment to run quietly at 50–70% capacity.
- Commissioning — measured airflow verification at every grille with a written balancing report — is non-negotiable; most failures are installation problems.
- Budget $6,000–$14,000 installed for new construction; hire a contractor with demonstrated high-performance-home experience and itemize commissioning separately.
A passive house is sealed so tightly that the air inside would go stale in hours without mechanical help — and that is entirely by design. Airtightness is what makes these homes extraordinarily efficient, but it also means ventilation stops being a background assumption and becomes a designed system as critical as the heating plant. Get it right and you get the famous passive-house payoff: silent, draft-free rooms with air fresher than a conventional home ever achieves. Get it wrong and you get moisture damage, stale air, and a very expensive lesson. Here is how to size, design, and commission ventilation for airtight homes in 2026.
Why Airtight Homes Cannot Breathe on Their Own
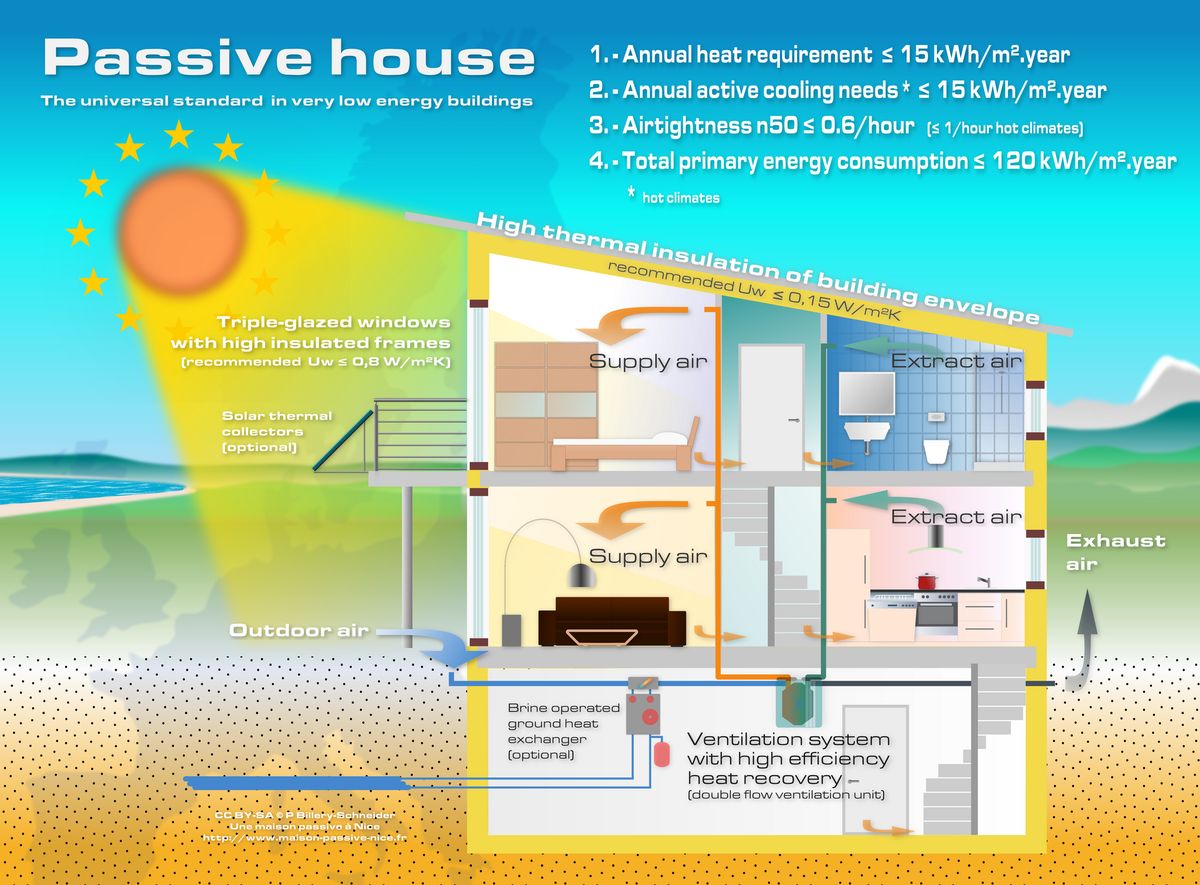
A certified passive house leaks less than 0.6 air changes per hour at 50 pascals of pressure — roughly ten times tighter than a typical code-built American home. Conventional houses “breathe” through thousands of accidental cracks: leaky, uncontrolled, and energy-wasteful, but enough to dilute indoor pollutants. Seal those cracks with meticulous air barriers, taped sheathing, and triple-glazed windows, and that accidental ventilation disappears. What remains is a thermos: superb at holding temperature, incapable of refreshing its own air.
Without designed ventilation, four problems accumulate. Carbon dioxide from occupants rises, dulling concentration and sleep quality long before it becomes a health issue. Moisture from cooking, showers, and breathing — a family of four generates gallons of water vapor daily — condenses on the coldest surfaces, feeding mold inside wall assemblies you cannot see. Volatile organic compounds off-gas from finishes, furniture, and cleaning products with nowhere to dilute. And combustion byproducts become genuinely dangerous in a tight envelope: any fuel-burning appliance needs sealed combustion and dedicated outdoor air, because a tight house will not forgive a backdrafting water heater the way a leaky one might.
The answer is continuous balanced mechanical ventilation with heat recovery — not a bigger bathroom fan, not opening windows when you remember. Supply fresh air to bedrooms and living spaces, extract stale air from kitchens and baths, and recover the heat (or coolth) from the exhaust stream on the way out. Done right, the ventilation system is the lungs of the house: quiet, invisible, and always working. Everything in this guide flows from that single concept.
ERV vs. HRV: Choosing for Your Climate
The two technologies look identical from outside — a box with four ducts — but handle moisture differently, and that difference decides the choice. An HRV (heat recovery ventilator) transfers only sensible heat between the exhaust and supply airstreams: in winter it pre-warms incoming fresh air with outgoing stale air, recovering 70–90 percent of the heat that would otherwise be thrown away. It does not move moisture, which in cold dry climates is exactly what you want — indoor humidity stays where the occupants put it.
An ERV (energy recovery ventilator) transfers both heat and moisture through an enthalpy core. In humid climates this is transformative: incoming summer air is pre-dehumidified by the outgoing cool dry air, slashing the latent load on the air conditioner. In winter, it returns some exhaust moisture to the dry incoming air, keeping indoor humidity from crashing. The rule of thumb: ERV for hot-humid and mixed-humid climates, HRV for cold dry climates, with mixed climates decided by which season dominates your discomfort and energy bills.
Do not overthink exotic options at the start. A quality ERV or HRV correctly sized and properly commissioned will outperform a fancier unit installed carelessly — and installation quality dominates real-world performance more than the last five points of rated efficiency. Choose the right type for your climate, buy from an established ventilation manufacturer through a knowledgeable dealer, and spend your real attention on the duct design and commissioning sections below. That is where passive-house ventilation succeeds or fails.
Sizing: The CFM Math That Actually Matters
Ventilation sizing for airtight homes follows ASHRAE 62.2, the residential ventilation standard: roughly 7.5 CFM per occupant plus 3 CFM per 100 square feet of floor area, with the number of occupants typically taken as bedrooms plus one. A 2,500-square-foot, four-bedroom home lands around 130–150 CFM of continuous ventilation. That number surprises people — it is far less air than a leaky house exchanges accidentally, which is precisely the point: controlled ventilation at the right rate beats uncontrolled leakage at five times the volume.
Size the unit for that continuous rate with headroom to run quietly: select equipment whose rated capacity at your duct static pressure comfortably exceeds the design flow, because a unit screaming at maximum speed is a unit the homeowner will turn off — and a ventilation system that gets switched off is a failed system. Most designers target continuous operation at 50–70 percent of the unit’s capacity, reserving boost speed for cooking, showers, and parties.
Size the distribution just as carefully. Passive-house practice favors many small supply points over a few large ones: short, dedicated duct runs to each bedroom and living area, with transfer grilles or undercut doors providing the return path to the central exhaust points. Long convoluted duct runs with multiple elbows strangle airflow and force the unit to work harder and louder. Have your designer produce a duct layout with calculated pressure drops per run — if the design was done “by feel,” it was not designed.
Duct Design and Commissioning: Where Projects Succeed or Fail
Here is the industry’s open secret: most ventilation underperformance is an installation problem, not an equipment problem. Commissioning — the measured verification that every grille delivers its design airflow and the system is truly balanced — is what separates a passive-house ventilation system from an expensive box humming in the basement. Insist on it in writing before the contract is signed.
Good duct design for airtight homes follows a few non-negotiable rules. Keep runs short and straight, ideally within the conditioned envelope (ducts in unconditioned attics are an efficiency and condensation liability). Insulate supply ducts in any location where the duct surface could fall below the dew point of surrounding air. Seal every joint with mastic, not just tape — in a balanced system, a leaky supply duct unbalances the whole house. And never share the ventilation ducts with the kitchen range hood: grease and ventilation cores are a terrible combination, and the hood needs its own dedicated exhaust with makeup air.
Commissioning itself is straightforward but rarely skipped by good contractors and almost always skipped by bad ones: a technician measures airflow at every supply and exhaust grille with a flow hood, adjusts dampers until each hits its design value within tolerance, verifies the system is balanced (supply roughly equals exhaust, so the house is neither pressurized nor depressurized), and hands you a written report. If your contractor looks blank when you say “commissioning report,” that is your answer about the contractor. This work requires a technician who understands ventilation, not just whoever was free that Tuesday.
Filtration, Maintenance, and Cold-Climate Defrost
The filters in your ventilation unit are the only thing between outdoor air and your lungs, so treat them as the critical consumables they are. Most units accept MERV 13 or better filtration on the supply side — fine enough to catch the particles that matter for health — and in wildfire-prone regions, upgraded filtration or even a portable HEPA strategy during smoke events is worth planning in advance. Check filters every three months at first until you learn your home’s loading rate; most households settle into a 3–6-month replacement rhythm.
Core maintenance is annual and simple: vacuum or wash the heat-exchange core per the manufacturer’s instructions (never use harsh chemicals on an enthalpy core), clean the condensate drain, and verify the outdoor intake and exhaust hoods are clear of nests, snow, and landscaping. Keep intake and exhaust terminations separated per the manufacturer’s minimum distance — short-circuiting exhaust back into the intake defeats the entire purpose and is depressingly common on sloppy installs.
In cold climates, frost protection is a design requirement, not an accessory. When outdoor temperatures drop well below freezing, moisture in the exhaust stream can freeze inside the core, blocking airflow. Quality units handle this with recirculation or supply-air preheat strategies; what matters for you is that the strategy is designed for your climate zone and does not simply shut the ventilation off for weeks in January. Ask the designer explicitly: “how does this system behave at minus 10 degrees?” The answer should be specific and boring. Vague answers mean frozen cores in your future.
Controls, Boost Modes, and Living With the System
A ventilation system the occupants fight is a failed system, so controls must be simple and the default state must be “on.” The unit runs continuously at its designed low speed — this is normal, correct, and the source of the famous passive-house air quality. Boost switches in bathrooms and the kitchen let occupants temporarily ramp up extraction for showers and cooking; timers return the system to normal automatically, because anything requiring a second human action will eventually be left on boost for a month.
Humidity-based or CO2-based demand control can modulate ventilation to actual need, saving energy in unoccupied periods — worthwhile in larger homes, probably unnecessary complexity in a small one. What matters more is that every occupant understands the two rules: the system stays on, and the boost button is for cooking and showers. Put a small labeled placard by each boost switch. It feels silly; it works.
Noise deserves its own mention because it is the number-one reason ventilation systems get switched off. A properly designed system is inaudible in bedrooms — that means acoustic duct lining or silencers on bedroom runs, the unit itself mounted away from sleeping areas on vibration isolation, and duct velocities kept low. If you can hear the ventilation from bed, the design failed regardless of what the airflow numbers say. Specify bedroom noise criteria in the contract (experienced designers know the targets) and verify by sleeping in the room before final sign-off.
2026 Costs: Budgeting Ventilation for Airtight Homes
Equipment and installation in 2026: a quality ERV or HRV unit sized for a typical single-family passive house runs $2,000–$5,000 for the hardware. Complete installed systems — unit, ductwork, grilles, controls, and commissioning — typically land at $6,000–$14,000 for new construction, climbing higher for complex layouts, premium filtration, or difficult retrofits. Retrofitting balanced ventilation into an existing tight home can run $10,000–$20,000 because the ductwork must be threaded through finished spaces. Costs are 2026 US market ranges; get itemized local quotes.
Commissioning should be a separate line item ($500–$1,200), not buried in the install — when it is itemized, it actually happens. Annual maintenance (filters and a service visit) runs $200–$400 if you hire it out, or the cost of filters alone if you DIY the simple parts. Energy cost of running the unit is modest, typically $50–$150 per year in electricity, which the heat recovery repays many times over in avoided heating and cooling load.
Hire a contractor with demonstrated passive-house or high-performance-home experience — ask how many balanced ventilation systems they commissioned last year and ask to see a sample commissioning report. General HVAC shops that mostly swap furnaces are not the right trade for this work. Permits are typically required as part of the mechanical permit; in a passive-house project the ventilation design is usually reviewed alongside the energy model. The cheapest bid from an inexperienced installer is the most expensive ventilation system you will ever buy.
Frequently asked questions
If blower-door testing shows the house is significantly tighter than typical code-built construction, designed ventilation moves from luxury to necessity — moisture, CO2, and pollutants accumulate without it. Even moderately tight homes benefit enormously from continuous balanced ventilation. Get a blower-door test first; the number tells you whether you need full balanced ventilation or can rely on simpler strategies.
ERV for hot-humid and mixed-humid climates, where transferring moisture as well as heat cuts the dehumidification load dramatically; HRV for cold dry climates, where you want to keep indoor moisture rather than exhaust it. In mixed climates, let whichever season dominates your energy bills and discomfort decide. Either correctly installed beats the wrong choice installed perfectly.
Residential sizing follows ASHRAE 62.2: about 7.5 CFM per occupant plus 3 CFM per 100 square feet, with occupants typically counted as bedrooms plus one. A 2,500 sq ft four-bedroom home lands around 130–150 CFM continuous. Have your designer run the actual calculation — and size the equipment to deliver that flow quietly at 50–70% of its capacity, not screaming at maximum.
Yes, but it is the hardest and most expensive way to get it — typically $10,000–$20,000 because ductwork must be threaded through finished walls and ceilings. Short dedicated duct runs within the conditioned envelope work best; long convoluted retrofits underperform. Get a designer experienced in retrofit ventilation specifically, not just new construction, and commission it the same as a new install.
Check filters quarterly until you learn your home's loading rate; most households replace supply filters every 3–6 months, more often in wildfire-smoke regions. Clean or service the heat-exchange core annually per manufacturer instructions, clear the condensate drain, and verify outdoor hoods are unobstructed. Annual professional service runs $200–$400; the filters alone are a simple DIY job.
A technician measures airflow at every supply and exhaust grille with a flow hood, adjusts dampers until each hits its design value, verifies the system is balanced so the house is neither pressurized nor depressurized, checks noise levels, and delivers a written report. It typically costs $500–$1,200 as a separate line item. If a contractor cannot show you a sample report, find a different contractor.